

This guide is correct as @ February 2019. Please be aware that MailChimp may change their procedures at any time. You can download a PDF version here
1. Select ‘Create Campaign’

2. Select ‘Email’

3. Enter the name of your Campaign (some campaigns may have a series of e-mails over a number of weeks – others may just be single e-shots)

4. Select ‘Add Recipients’

Click on the arrow to select a distribution list – you may have more than one.


N.B. If you have segmented your e-mail lists, you could select a specific segment. You also have the option to personalise your e-mail. Please check out the MailChimp guides for more information.
Press ‘Save’

5. Select ‘Edit From’

You need to enter a name and e-mail address of whom the e-mail should come from. It will default to the details you have in your account setting however you can overtype these. It is best to use your agency name.
Please note: E-mail addresses different to that used when setting up your account will need to be verified. It is best to use the same details for all e-mails as customer may ‘whitelist’ your e-mails so they receive them. If you change names or spellings regularly, e-mails may not get through spam filters.
Press ‘Save’

6. Choose your Subject Heading – select ‘Add Subject’
N.B. As per step 3, some campaigns may have a series of e-mails over a number of weeks. The whole campaign may be called ‘Tenerife’ but the individual e-mails may have a subject header as the name of a resort or hotel you are focussing on within that particular e-mail.

Enter the subject heading and the preview text which will show to customers when the e-mail drops into their Inbox. Press ‘Save’

7. Select ‘Design Email’

Select ‘Code your own’

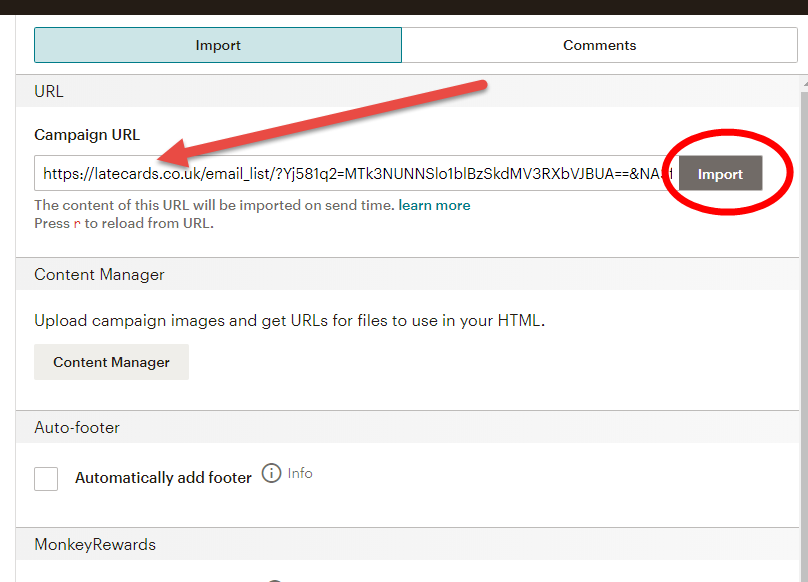
Select ‘Import from URL’

Paste in the newsletter URL you have obtained from Promote/ LateCards and select ‘Import’
8. Tick ‘Automatically Add Footer’ then select ‘Preview and Test’ at the top of the page.
*** IMPORTANT ***

*** IMPORTANT – ENSURE YOU SEND A TEST E-MAIL ***


Double check the e-mail has come through as it should and all the contact details are correct. Also click on an offer and double check it has a landing page (with correct contact details) and a link to your website to the top right.
When you are happy with the test, click ‘Save and Close’ at the bottom of the screen

9. This will take you back to the main page where you have been setting up your e-mail throughout the process. You will have 3 options at the top of the page.

i) Finish later – save your e-mail and come back to it later if you need to
ii) Schedule – choose the date and time you wish to send your e-mail

iii) Send – start sending the e-mail to your e-mail distribution list now
Please

Please note: This guide has not been produced by MailChimp and is purely to help Users import newsletters/ offer e-mails created in the Promote/ LateCards system to MailChimp ready for distribution. For help and information on how to use all the tools offered by MailChimp, please refer to the ‘Help’ tool at the top of the MailChimp website.